______ Points

|
Science
Fair Project
|
|
|
______ Points
|
|
| This project involves the use of the scientific method in order to solve a problem. In solving the problem, you will conduct an experiment and record the results. |
Here ís a list of the due dates for each part:_________________ Topic picked and OK'd by teacher._________________ Diary and experiment begin (Daily logbook)._________________ Lab report is due (include a diagram)._________________ First draft of research is due (5 pages, 3 sources)_________________ Diary ends. Begin making graphs and finishing report._________________ Written report is due (including graphs)._________________ Science Fair display (posters, etc.) due._________________ P.C.I.S. Science Fair for best projects.Requirements: This project should includeÖ
Total length of 15 pages.
 Science Fair Project Your science fair project should
follow the format of the scientific
method.Step 1.
Define the Problem
Science Fair Project Your science fair project should
follow the format of the scientific
method.Step 1.
Define the Problem
Final Note:
Completion of this project shows that you have learned how to conduct an experiment as a scientist would. This is a very important goal. While some class time will be devoted to the science fair, most of the work of the science fair will need to be completed at home.
___________________________ ______________________________
| (Student Signature) | (Parent Signature) |

State the purpose of your project
Example:The purpose of this experiment is to find the best distance from a fluorescent light for growing ivy cuttings. We have been growing ivy cuttings in water on the windowsill for many years. Now, I would like to try to grow them under our new fluorescent light. My mother will be able to use my results to grow ivy cuttings for her friends.Step 2. Research
 Use at least three different
sources including books, magazines, Internet, interviews, encyclopedias, etc.Read, Read, Read!!
Use at least three different
sources including books, magazines, Internet, interviews, encyclopedias, etc.Read, Read, Read!!
Remember that you should research all aspects of your experiment.Example:
For research on ivy (Hedera helix)
- Look in books on house plants, gardening, plant encyclopedias, etc.Also research hydroponics
Also research fluorescent light
Now, combine your research and organize your notes into a research report.Don't forget to include pictures and diagrams as part of your research! Step 3. Hypothesis
Include other guesses such as height, color, condition, size, time, etc.Now that you have read about your topic, you should be ableto ask yourself specific questions about it. You should be ableto answer the questions with intelligent guesses or hypotheses.I believe that the ivy plants closest to the fluorescent light will grow best. Fluorescent lights are often used in indoor gardening and do not emit harmful quantities of light. Based on my research, I think this group will grow 6 cm. taller during the experiment. Also, because these ivy plants get more light, their root systems will also grow best. The following is a chart of my predicted results for each group:
![]()
Hypothesis - Ivy Group A averages
| Date | Height in cm. | # of leaves | Avg. root length in cm. | Expected Observations |
| 1/1/99 | 4 | 5 | 0 | Initial sizes. |
| 1/8/99 | 4.5 | 5 | 0 | Leaves will grow before roots start. |
| 1/15/99 | 5 | 5 | 1 | Roots will begin to grow. |
| 1/22/99 | 6 | 6 | 1 | More leaves will follow. |
| 1/29/99 | 7.5 | 6 | 2.5 | Leaves and roots will grow faster. |
| 2/5/99 | 8 | 7 | 3 | All parts will grow fast. |
| 2/12/99 | 9 | 7 | 4.5 | Roots will grow very fast. |
| 2/19/99 | 10 | 8 | 6 | Plant is very healthy, ready to transplant. |
| Totals | 6 | 8 | 6 |
Notice that this is just the chart for group A. You would also need hypothesis charts for groups B, C and D

It should be a controlled experiment. This means that each group should have everything the same (amount of water, # of leaves, etc.) except for one variable (in this case, distance from the light). Each experiment should have at least 3 trials also (in this case, 5, 10, 15, and 20 cm. from the light).
Now, it's time to make a lab report. Here's what it should look like:
Lab Report
Title: (in the form of a question)Purpose: (reasons for doing this experiment)Materials: (this should be a list of everything needed to do your experiment)
Procedure: (step-by-step instructions on how to perform your experiment). Number the steps and donít forget any details! Any person should be able to duplicate your experiment by reading your procedure. Also, include a diagram to help with your explanation.
Expected results: (hypothesis and predicted numbers)


You must keep careful records of all that you do and all that happens during your experiment. This should be in the form of a daily diary called a logbook..Example:1/13/99
Today I checked my plants at 5:30 P.M. I noticed that Group A seems to be growing faster than groups B, C, and D. Specifically, plant A2 seems to be growing the best. The plants in Group A arenít just taller, but seem to be greener and more healthy. It is interesting to note that the plant with the longest root development is plant C3. I donít know the reason for this. Here is a chart of my results for today:
| Plant | Height in cm. | # of Leaves | Root length in cm. | Observations |
| A1 | 5 | 4 | 3.1 | Has not grown |
| A2 | 5.2 | 5 | 3.4 | Has a new leaf |
| A3 | 5.3 | 4 | 3.4 | Is tallest in the group |
| B1 | 4.9 | 4 | 3.1 | Has not changed |
| B2 | 4.8 | 4 | 3.0 | Has not shown growth |
| B3 | 4.8 | 5 | 2.5 | Poor root growth |
| C1 | 5.0 | 4 | 2.3 | Poor root growth |
| C2 | 4.3 | 5 | 3.4 | Lowest height |
| C3 | 4.5 | 4 | 4.2 | Longest roots |
| D1 | 4.3 | 4 | 3.2 | Lowest height |
| D2 | 4.7 | 4 | 2.9 | Low root growth |
| D3 | 4.4 | 4 | 2.0 | Least root development |
Now is the time to make charts and graphs to show your results!
- You should make graphs to show your point of viewSet the scales of the axis to emphasize your resultsProve your point with your graphs!All graphs should be neat and include a chart of the numbers that you used.At least one graph should be handmade.At least one graph should be computer made.At least one graph should have a key.
- You could also use photographs, models, and drawings to help show your results.

Example:
After you have recorded your observations,
you should be able to answer the question that you asked in your hypothesis.
Compare all of your graphs!! Now, put your project
together as follows:
Now, put your project
together as follows:
Cover A good cover that shows effort. Donít forget a full heading!Table of ContentsPages numbered and in the correct order. Use the order given here!Lab ReportYour lab report that ís already completed. Make sure youíve made corrections and included a good diagram with labels.ResearchRe-copied with corrections. Donít forget pictures!HypothesisYour predictions (numbers) for each group each week and reasons why.DiaryMetric measurements for each day with comments. Make sure itís neat!Check HypothesisCompare you actual (metric) numbers to your predicted numbers. Also give reasons why.GraphsAt least 3 graphs. They will be graded on accuracy, neatness, and presentation. Use graph paper for any handmade graphs. Every graph needs a chart with the numbers that you used for that graph.Analysis of GraphsExplain each of your graphs and prove your point. Use sentences like "I did this becauseÖ", "You can see thatÖ", "Notice thatÖ", "CompareÖ", and "This proves thatÖ"BibliographyAt least 3 sources. Include author, book name, publisher, copyright date, and volume. Include the URL and the date of any Internet sources.Acknowledgements (optional)
Thanks to....or any comments about your project
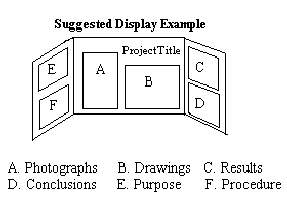
After your project is graded, you will be asked to do a Science Fair PresentationHere's how to make a great display:
Materials:
Make the backboard from any sturdy material. Remember that it should stand by itself on the table. Plywood, pressed board such as masonite, heavy cardboard or foamboard would be a good choice. Assemble the material into 3 sections with hinges or strong tape.
Color
Before you go any further, decide what colors you will use. If your background needs painting, enamel paints works best. Choose contrasting colors for lettering. If you are in doubt about your color combination, get another opinion.
Lettering
Your title should be cut out of construction paper and attached (taped or glued) to the background. The use of large stencils or a computer will make the letters more attractive. Posters can be lettered by hand, but first do them in pencil and later re-trace them in marker. Stick-on letters can also be used.
Drawings
Drawings and sketches should always be done in pencil first and then re-traced. Large, poster size drawings can be enlarged using an overhead or opaque projector at school.
Photos
Good photography can be enlarged at a photo dealer so that you can show how you set up your experiment. Every project does not need photos, but if you have a camera, you might consider recording your progress. Always label your photos!


Use copies of this page to help you remember what you'll need to get from each book for your bibliography:
![]()
Bibliography Verification Name:___________________________Period:______ Date: ______________ Topic Area:
Circle Source:
| BookPamphlet ArticlesPeriodical ArticleNewspaperFilm | TV |
| Video RecordingInterview CD ROM Internet |
Use correct citation and modify the space below if necessary:Title: (or name of web site)Author:Date/Publisher / Pages:Web address, if it is a web site:(URL)Last date web site was updated:Date you retrieved web site information:LOCAL/REGIONAL/STATE JUDGING CRITERIA
TOPICS FOR CONSIDERATION IN JUDGING
The Science Fair focuses on the exhibitor and what he or she has learned about the chosen subject and the scientific process in general. The quality of a studentís project will be judged not only on what is exhibited but also upon the exhibitor's ability to discuss his or her work intelligently.
SCIENTIFIC APPROACH TO THE PROBLEM
ORIGINAL NOTEBOOK/FORMAL LAB REPORT
THOROUGHNESS
INGENUITY AND CREATIVITY
EXHIBITOR'S ADVANCEMENT IN SCIENCE
Safety Rules for a Science Project
SCIENCE FAIRChemical Release Form
Student _______________________ Course ____________________Teacher _______________________I requested the following chemicals for my childís science project:Cost: Chemical Name: Amount: Hazard:$_______ ______________________________ _____ ____________________________ ______________________________ _____ ____________________________ ______________________________ _____ ____________________________ ______________________________ _____ ____________________________ ______________________________ _____ ____________________________ ______________________________ _____ ____________________________ ______________________________ _____ ____________________________ ______________________________ _____ _____________________$______ Total Cost
I have been informed of the proper handling procedures and special hazardous qualities of each of the above chemicals. I will supervise my child in their use and disposal. I will NOT hold the school authorities LIABLE in the event of injury caused by any of the above chemicals. I also agree to pick up the requested chemicals at school and transport them home in my personal vehicle.Date_____________________ Signature _________________________________
(Parent/Guardian)